Wednesday, August 29, 2007

Raised Patio: 2fer


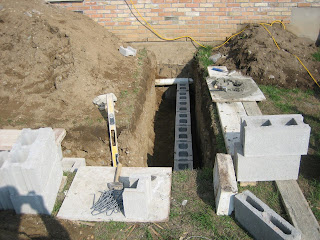
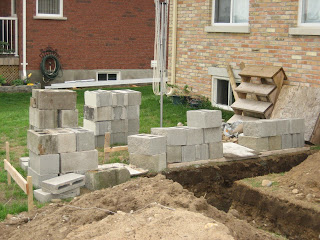
Well, the last few days have seen the wall finished and the arrival of some of the precast beams. With the walls done, four more holes had to be dug to support cast-in-place beams. These beams will support the deck slabs, while the precast pieces that you can see on the walls go underneath the balusters. Two sample balusters can be seen - now it is a matter of determining how far apart they should be. These two are visual aids for this process.

The top row of blocks underneath the beams are filled with concrete to prevent water from getting inside the wall through the holes in the blocks. Water will still be able to get through the blocks themselves, but not nearly as much as would get in through the top. The beams on the wall are there mainly to ensure that the railing is high enough to meet local code.

The columns that will support the cast-in-place beams consist of a concrete base with 8" blocks cut in half. These are filled with mortar as they are added with a rebar in the center. The rebar will stick into the beam above and tie everything together.

The precast beams on the top of the walls are sitting on mortar, which I had to mix by hand. Turned out okay - made some "ready-mix" by dry mixing the sand and cement. Then mixed half by slowly adding water. This left half the wheelbarrow dry, giving us enough time to put the beams on one side in place without worrying about the mortar hardening.

Anyway, that's it for now. Today we have to put the last beam on the wall, get the columns finished and start the forms for the cast-in-place beams.

Saturday, August 25, 2007

Raised Patio: The Friday Edition


Friday was a pretty straight-ahead work day. Started around 9am and finished by about 5pm. Only did two mixes, but the labourer is inexperienced (read: slow) and the bricklayer was taking his time (read: doesn't do this every day anymore). Ran into one small problem with the white pipe you can see in some of the photos above. That pipe carries rainwater from the downspout over to the west side of the house. There is meets up with pipe that heads out about 20 feet into the lawn, into something the builder describes as a pipe with a sock stuffed with styrofoam peanuts. This is to help let the rainwater soak back into the ground, although the builder isn't impressed with it - more on that later.

The reason it was an issue was that once the blocks got closer, it was obvious that the pipe was sagging at the joint. I found it was wet under the joint after I excavated it but didn't really notice the slope was funny. The probable cause was the person that backfilled the foundation of the house - they dumped a load of earth right on the pipe. You can tell this because the side that heads toward the middle of the house has a hollow under the pipe. Plus the pipe in the other side of the trench had rocks above and below it, meaning that they had been pushed towards the foundation. The rocks are another sign the back fill was done without much care - rocks rise to the surface as you move dirt or dig. If one takes care, the rocks would be spread out evenly, instead of collected by the foundation (the last place to be filled).

Anyway, the concern was that if there was an issue with the pipe leaking or not draining, the fix would involve either working under the completed deck or removing the deck surface. The time to fix it was before the deck was complete and access to the foundation area was easy. Called the builder and he was able to show up that day. He went on about how he disliked the drainage system, clarifying how everything worked. I originally thought that the weepers and the downspouts were tied to the storm sewers, as this subdivision has a special storm overflow pond to collect excess rain. The system that the downspouts tie into is like a simple septic bed. The difference is that there is one outlet instead of a trunk with smaller tiles coming off it.

The builder is not happy with this solution for a few reasons - one it doesn't work and two it is an expensive solution. The pipe is 4" and that isn't really big enough to handle the roof water of a big downpour, let alone a storm. The downspouts backed up before we moved in, according to our neighbours, last year. This spring the builder quietly installed an overflow valve, which is essentially a standard downspout that drains onto the lawn. This works better than the underground drain pipe because it can handle the volume better and the ground in this area is sandy. Water drains away quickly whether it is on top or not. The overflow valves aren't supposed to be there, but the builder is reluctant to criticize the existing system. If this system isn't working, the next step would be to put something like a septic bed in the ground, which would be quite expensive. Also it would make it impossible to build things in the back yard without a hassle. Things like a pool.

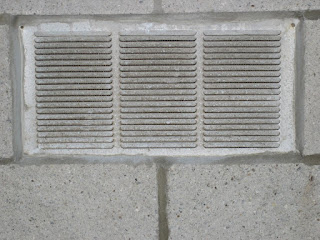
One of the columns is clearly visible in a picture above. There will be four of them, one on the front corners and on either side of the stairs. One solid day of work should bring the other 2 sides up to the level of the highest side, which is the top of the masonry wall. Note the picture with the vent in it - this is secured with mortar, no anchors or caulking necessary. My dad was annoyed when we were working last year because the various holes necessary (gas, exhaust vents, etc) weren't known until after we was done. If the final pipe that was to go through the wall was available, he could have finished the surroundings with masonry and it would look better than it does now. Although it is a small detail that most wouldn't notice, much like the sills and lintels on the house. The sills are at least twice as thick as the other precast sills, but smooth. The lintels are also smooth precast pieces, instead of concealed metal ones. Finishes the doors and windows nicer than the others around here. Again a small detail that most wouldn't notice unless it was pointed out.

Thursday, August 23, 2007

Raised Patio: Thar be masonry a foot!


The started off slow enough - managed to get a post in this morning showing the previous day's work. Rain on and off all morning, finally ending around 11am. Got some stuff setup to be ready to get some blocks on those footings. After lunch - we were off! As you can see, the day ended with one side high enough to start with the above-ground blocks. These are a textured block known as a split-face block.

Figured out why they are called "split-face" blocks yesterday (and it is so simple you'll probably be as upset at yourself as I was). The blocks are cast with two facing each other and then a machine splits them apart. This is done in such a way that where the blocks are split it becomes a rough, textured surface. Since is the side that points to the world (the "face") we get "split-face". Fun.

Anyway, it wasn't all sunshine and heat stroke (though I came close). The first course (masonry term for "row of whatever") was made up of some left over 10" blocks my dad had. Many jobs are setup so that the trade is responsible for ordering the materials, so anything extra is theirs (they paid for it). Sometimes some demolition has to be done, so the debris is discarded. However if some is salvageable, the owner doesn't mind if someone takes it away as they have to pay to remove it. So this is how we had some odds-and-ends.

Just realized that most people probably don't know what I mean when I say 8 inch or 10 inch blocks. The measurement is the width of the block, so the resulting width of wall made out of the block. A standard 8 inch block has two holes in the middle, with bits sticking out of each end. Back in the day, there were three holes (so the gaps were smaller) and the blocks weighed more. There were also solid blocks which, as it sounds, had no holes at all. My dad said that working as a labourer and piling 12 inch solid blocks onto a plank above your head makes you tired really fast. Yah.

Anyhoo, some of these 10" blocks were of various types, some even being split-face blocks. The thing with a split-face block is that the face is twice as thick as a standard block, so it is much heavier. And 10" means more volume and so on and so forth. Some were old enough to have 3 holes instead of two, but luckily there were not many of those. Plus they got put in first, so no ones back was aching by the end of the day.

Also had much fun with the second mix of the day (we did only two). Got the proper instructions on the measurements needed, but we both forgot that there was already some water in the mixer. So I followed the instructions and the mixer looked like soup (not a good sign). I was wondering what I should do when all of a sudden it just tips the load onto the ground! The mixer reject the mix! How could I screw up so bad??? Looking at what happened, the pin that holds the mixer at the proper angle fell out, causing the load to force the barrel of the mixer over. That in turn was likely caused by the mixer being too low on one side. Luckily, we were able to rescue some of the truant mix and, using alchemy and experience, my dad was able to create a workable result. It wasn't soup, but rather pasta-sauce quality. Picture if you will, a wall held together by last nights dinner.... Dumping shovelfuls onto a mortar board resulted in something that looked like ladles of sauce blopped on a plate. The magic of hot direct sunlight saved the day, reducing the sauce back into mortar within about a half-hour.

Tomorrow is set to be a full day of blocks. Hopefully we can get lots done before the weekend...

Raised Patio: Footings and More


As promised (well, written, blogged, whatever) I have new pictures with the completed footings. Plus, there are pictures of the blocks we'll use underground and the brick sand.

Getting the sand was eye-opening in several ways. We drove to a local gravel pit and asked for a minimum load (ie put it in the bed of my dad's pickup). They charged us $10 for a cubic yard of fine screened sand. Nice stuff - the kind you'd want to put in a child's sand box. My wife informed me that a bag of "play sand" costs about $2 for about 20kg of sand. Doing some quick online checking, the density of dry sand is about 3000 lbs/cubic yard or 1780 kg/m3 (where 1 m3 == 1.308 cubic yards). That gives about 68 bags of play sand for $10. Only problem is that you have to find a gravel pit, bring a truck and shovel it into all 68 sand boxes by hand. Oh well.

Anyway, today we will start with the laying of the blocks, if the weather cooperates. Looks pretty overcast right now, so we'll see.

Wednesday, August 22, 2007

Raised Patio: Footings


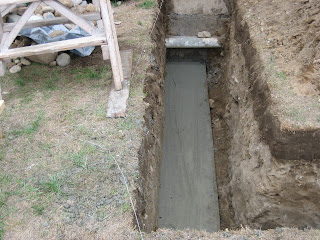
Tuesday was the day to get the footings done. That means the trench was finished and my dad leveled it, added a few boards as forms and we started pour concrete. But first things first - what's a footing? A footing is a small (~10" wide) , thin (~4" thick) slab of concrete that supports a wall above it. Kind of like a sidewalk, but it has to be put under ground on undisturbed soil. In places like here, (Southern Ontario), it has to be undisturbed soil that is beneath the frost line, so 3 to 4 feet down. This is to prevent the footing from shifting or buckling. Footings can be, as in this case, poured directly onto undisturbed soil inside a form. The form here consisted of planks on onside of the trench, with the other side chopped straight, the soil forming the side. The footing will be buried so finish is not important.

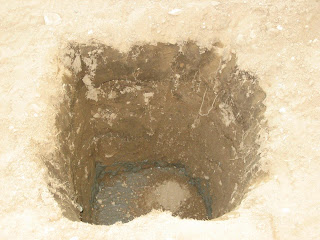
As you can see in these pictures, part of the problem with building this deck is that the footing needs to go right up against the existing wall. The ground near the house is back-filled and has not yet had the necessary amount of time to settle. Excavating within about 5' of the house meant that we were not on undisturbed soil. To counter-act this problem, 2 holes (3-4 inches deep - about half the thickness of the basement wall) were drilled in each section that met the house. Into each hole went an 8 foot long piece of rebar. This effectively ties the footing to the house, so any movement has to move the house and the footing together. Note that this is not a challenge, as I like the house and footing where they are.

The pictures also show some of the footing. To pour the footing to this point required about 2/3 of a cubic yard of concrete. My dad and I mixed the concrete and brought it on-site. This resulted in a vast monetary savings and a lot of work. A yard of concrete, from a company like CBM or Lafarge, would cost about $400 delivered. The cost of the materials in this case was about $40 of aggregate and gravel and $100 of cement, although that last number is probably high. However, we did have to shovel the gravel into the mixer and then from a box into the trench. The weight of 1 cubic yard of concrete is about 2400 kg, so this was about 1600 kg. Shoveled twice. But cheaper than the big spin-y truck.

We ran into problems when we got the concrete on site - it was hardening quicker than expected and was difficult to shovel. As in it was almost one solid mass. The pickaxe did the trick however and loosened it sufficiently.

Also present are some concrete blocks, sometimes known as "cinder blocks", but in this case 8" standard concrete blocks and 8" split-face blocks. The split-face blocks are what will form the walls above the ground on the outside. Other, older, left-over 8" blocks will be used below ground.

That's all the pictures I have right now, but tomorrow I will take pictures of the finished footing, the extra blocks and the pile of brick-sand. Tomorrow is when the blocks start getting laid.

Sunday, August 19, 2007

Raised Patio: EnTrenchMent


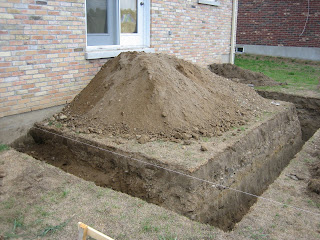
Yes, weak pun, but at least it is something. Went out this morning (as promised - all you that like to read this blog in real-time). Only stayed out about 1/2 hour because of the rain, but I was able to make some progress. The rain is being really half-assed about it - a little drizzle here, a few drops there, five minute rush - no commitment! I may be able to squeeze in another session later. But I was able to snap a few pics before I went in and here they are.

Again with the...

I have title-block today, probably because I shouldn't be here, but rather outside and digging. It's supposed to rain today, probably just after noon, and I have to get a bit done of my trench, er footing. I asked the building inspector to show up tomorrow so there is a tight deadline...

Anyway I have not been posting this week, though I promised it. I really did want to record in pictures the progress I was making digging my deck footing, but it is (un)surprisingly tiring. I set aside about an hour each morning an evening (skipping the mornings with hockey commitments of course!) and when I was done, I was DONE for the day. Showered, sat down and that was about it. Today I shall have to take more pictures.

Fret not, however. The pictures and posts shall increase in frequency as will the pace of work. A couple of weeks off of work will allow me to blather on about whatever AND help assemble the deck. I am under no illusions about who is in charge of that. It is the guy who cast all the concrete - my dad. Anyhoo, I should get out that and start shoveling.

Sunday, August 12, 2007

Raised Patio: The Hole Beginning


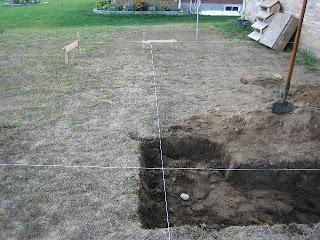
Why must I use bad puns for blog titles? I feel it is some sort of obligation, but I can't really put my finger on it. Anyway, I promised pictures and here are some. The first one shows the lines staked out - 10'x16'x10' will be the final surface area of the deck. The second one shows the progress I've made closest to the house. The white pipe is the downspout runoff that hooks up with a weeper that empties at the end of the property. The last picture shows how much more I really need to do.

This isn't too bad - I've only been out 3 times for about 1-2 hours each time. I'm planning on going out twice a day (morning and evening) for about an hour each time and that should show some real progress.

Everyone asks me "Why are you doing this by hand?" Two reasons:
  1. Bringing in a small backhoe will ruin the grass. Although it is not green, let me tell you the roots are quite large and holding things down nicely.
  2. I need the exercise. It's one of those things - doing it by hand makes me feel like I've put more into the whole endeavor. Also lets me practice skills that don't involve machines or some-such. There was a time that everything was built using simple tools, so it is simply a question of how much time you have to finish.
Anyway, if I don't make enough progress, we can hire someone to come and do it with a machine. Would take more than 1 hour I think. Will take me a solid week, but whatever. Anyway, more updates will appear as things keep progressing.

Wednesday, August 8, 2007

Bender Brau

I just had to record this somewhere - someone in New Zealand is building a life-sized Bender. Not impressed? It's also a brewery! Neat! Maybe one day I'll have my own Bot-wiser chilling in the fridge too...

Tuesday, August 7, 2007

Starting groups

My workplace moved to Agile development methodologies more than a year ago now, though it hardly seems that long. One of the techniques that was used in a few situations was to form a group and then allow the group to create the parameters, purpose and direction for the group.

This idea works well when used in the appropriate situation, but I think it had a less-than-optimal effect in some cases I was involved in. I'll describe those situations, propose an alternative group-start and finally end with where the "self-determining group" technique should be used.

The first time I encountered this technique was in the early introduction stages of Agile methods at our company. Some of the meetings were held using this technique to get the group to direct the presenter to the items that the group needed more information about. This did not work for two main reasons:

1) The audience was mainly people who knew nothing of agile methods, so had a poor understanding of the technique. Not knowing how to use the technique made things awkward.

2) The purpose of the meeting was deliver information to a group that is used to logic and structure (software developers). Going into the meeting, they all knew that they would be getting more information. Being asked to discover what the information was without knowing what it was seemed redundant.

Together the impasse is clear - the attendees were obliged to attend a presentation but were confronted with an unfamiliar process. I think such a meeting would work better a year later - the patterns are comfortably familiar.

The second time I encountered this technique was in the formation of an Agile "group". In this case, the technique was applied pretty successfully, but looking back I do not believe that it is the most efficient way to proceed. In the first meeting, this group had a purpose and dove into that head-long. By the second meeting, a split in the purpose became apparent. This was handled in an open fashion, quickly addressing the difference and the group moved on with an adjusted purpose. I think that the initial problems came partly from the fact that the group wasn't entirely self-selected. That is, some members were asked to attend instead of choosing to attend. The other reason for the slow start is that it seemed to take several meetings to work out all the details of what needed to be done.

What I hypothesized this was that a middle ground is needed to make things more efficient. The concept that the group needs to be self-determining is essential, so nothing should interfere with that. The only place left is in the initial group setup. Instead of proposing a group, organizing a meeting and then having the group decide everything from there, I think the initial proposal should include a sample framework. This would give more clarity to the purpose of the group and possibly save time if the group likes the initial ideas straight-away. If not, the group proceeds as before. I'll give a high-level example and a more concrete example.

The high level example is the idea of democracy. Some would like all decisions to be determined by vote, much like the earliest democratic ideals. Each citizen would have a vote and all decision would be taken based on voting results. Operating a modern democracy in this manner would be difficult because of the overhead. Instead, representative democracy allows representatives to work at some proposals and refine them before bringing them before the people. The one-vote-per-topic idea is like the self-organizing groups.

More concretely, let us say I'd like to start an Agile book club. The self determining method would see me send out a message saying "Agile book club is starting. First meeting Monday." The group would meet and begin the proposals for what the book club is about. Using the "proposed structure" method, I'd send out a message saying "Agile book club. Initial idea: Critique of sci-fi/fantasy books during weekly round table meeting. Please bring your proposals and ideas to the meeting Monday." This message conveys more information than the first, although it may bias what people think the purpose is. However I submit that if the attendees are comfortable in the Agile process, this would not prevent them from bringing their own proposals.

I think that the "proposed structure" methodology would work good in transition from a traditional work environment to an Agile one. With enough experience, the "self determining" method would work well, but until some additional skills are learned and techniques refined, it could be slower. The idea would be to encourage dialog and participation, but the mere lack of structure may turn many off. You need people there before you can accomplish anything.

If you've made it this far, you may have noticed how loosely tied this all is. I'll try and refine this idea in subsequent posts, but I apologize for my late-night incoherency. I did, however, feel it necessary to record the outline of the idea anyway.

Foaming at the nest

Yesterday was another lovely civic holiday. Not a vacation for Honda owners, but rather a Monday with no work. No work that involves leaving home anyway. I undertook some mundane chores - vacuuming, cleaning the furnace filter, buying food. The filter was the most interesting however. I decided that the best place to dry off (and generally cleanse) the filter would be in direct sunlight, so I brought it out back and headed back in to wait for dryness to set up it. I was not in 30 seconds before my wife indicated a wasp had gotten in. Urgently indicated, with overtones of alarm (she don't like wasps). It longed to pass through the glass in the door, so I helped try to push it out. Alas, the glass proved too substantial and it was merely crushed by the whole ordeal. Heading out a few minutes later, I picked up the clean and dry filter and head in. I paused at the door to survey the air for any manner of flying fauna. Seeing nothing, I entered the doorway. Just as I began that little dance out of the way of the door, I felt something encouraging my calf to just keep moving. It was another wasp, hitching a ride to the great Indoors. Once inside, it too wished to join its' sisters on the far side of the glass and again, glass provide transparent but tangible.

At this point, my wife suggested there may be a nest under the stairs at the back door. I ran out, found the problem and wandered to the front door to contemplate my next move. Evidently that mostly full can of wasp/bee foam was in for more than just shelf-sitting.

Since I had discarded the little red straw this time, I was not in fear for my life when I strode forth after dark. Being close to ground level also made this a tad simpler, but I brought my flashlight anyway. The nest was barely started - several adults clung to the outside. Probably 2 or 3 days old - barely a wasp-body deep, but expanding rapidly horizontally. Foamed up the nest. Some of the adults tried to leave - the poison made them stumble about. They fell free of the nest to the ground below. Since I really couldn't have that, I foamed everything under the stairs. As more fell or wiggled free, they got wrapped in foam too. I'm guessing I created a nice deadzone under the stairs. I'm hoping that I avoided creating a dead zone in my lungs though.

Regaling my co-workers with said story lead to the out pouring of different insect-nest perspectives. There was the "it's under the deck, but I can't see it. So I grabbed a screwdriver..." Several advised that if something wrenched the screwdriver from your hands, that was the signal to start running. Next was the "it was hanging near the basketball net, but too awkward to spray. After throwing the basketball as hard as I could, I quickly ran away." Like Brave Sir Robin, he ran away and only the curious dog from next door found out that wasps don't like to be disturbed.

Raised Patio - The Deckening

Yes, it is probably the weakest pun-like title you've had the misfortune to read. I know it - you know it, and probably some search engine spider knows bit, but they don't say much. Today was another milestone day for my deck-like-object. My dad came over and we staked out the deck. Now as I mentioned here, this is not simply wooden platform floating out back of the house. No, that would be cool but I lack the super-conducting technology to make insulators hover. No, this is something more... concrete.

Yes concrete. Precast slabs, balusters, split-face block - it has it all. The first step, as with any structure, is to setup a good foundation. In this case it means me digging a trench for the foundation. Before I can do that, I needed something to show me where I should dig and it happens to be a bunch of string and wood. I'll add a picture soon, but for now imagine that there are some stakes, 4 pieces of string, and some nails, marking a 15'x10' area (okay, 16'10"x 10'6" if you want outside measurements). So over the course of the next few days I'll have to start digging. I will record my progress here and, well, that is that.